In the first part of our series, we outlined the user story and established a solid understanding of what we need to implement. Now, in this second part, we will focus on setting up the project structure and preparing the foundation for development.
Repository Update
The repository for this tutorial series is available on GitHub: BookShop Repository. All the code updates for this project are being committed to the main branch. You can clone or download the repository to follow along with the implementation.
All tutorial’s Link :
- Unlock the Secrets of ASP.NET Core 9 Authentication and Authorization: A Powerful Step-by-Step Guide (Part 1)
- Unlock the Secrets of ASP.NET Core 9 Authentication and Authorization: A Powerful Step-by-Step Guide (Part 2)
Step 1: Create an Empty Solution
The first step in building any project is to create a solution that will house our application. For this tutorial, we will:
- Open Visual Studio (or your preferred IDE).
- Create an Empty Solution and name it
BookShop.
This solution will act as the starting point for our application development.
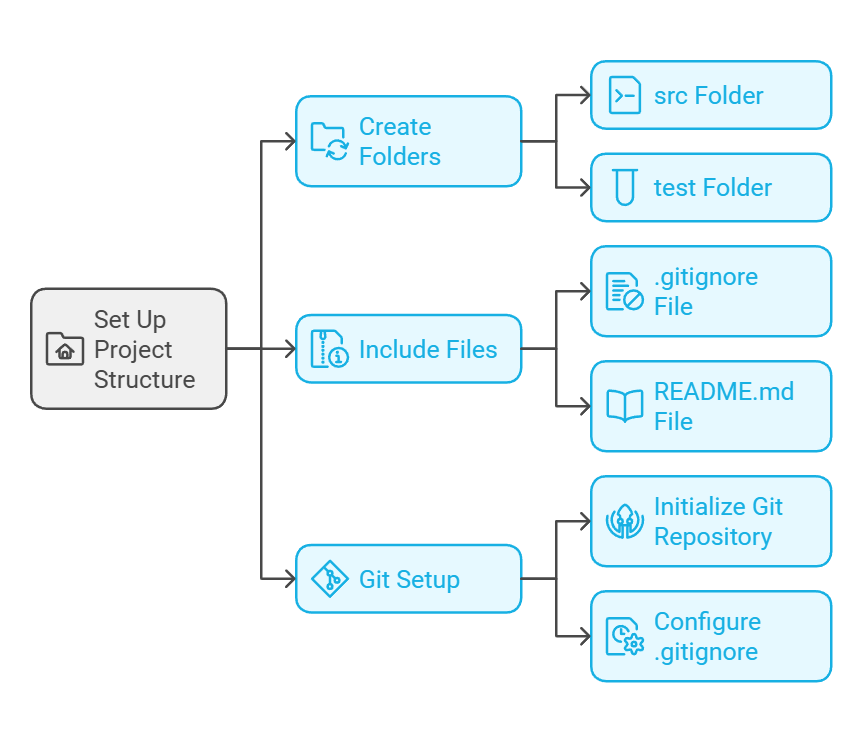
Step 2: Set Up the Project Structure
Before diving into writing code, it is important to maintain an organized structure for your project. This includes:
- Folder Structure: Create the following folders within the solution:
src: This folder will contain the source code for the application.test: This folder will contain unit and integration tests.
- Files to Include:
.gitignorefile: This file is essential for ignoring unnecessary files in your Git repository. We will generate this file using Toptal’s Gitignore Generator. In the search box, enter the following terms:aspnetcore,visualstudio,visualstudiocode,riderREADME.mdfile: Add a README file to provide a brief description of your project. This file will serve as documentation for your repository.
- Git Setup:
- Initialize a Git repository in your solution folder.
- Ensure the
.gitignorefile is properly configured.
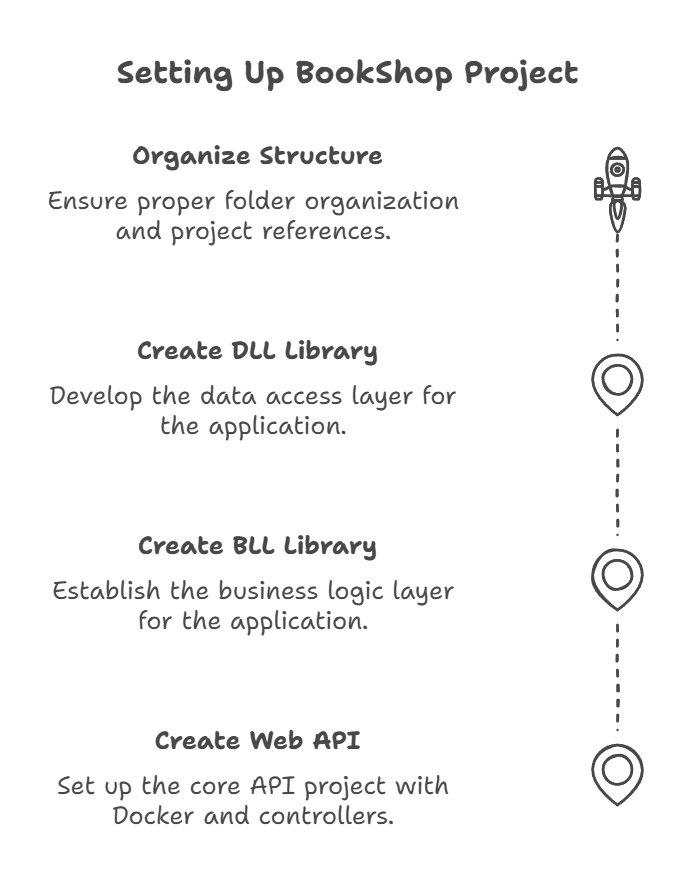
Step 3: Before the First Commit
Before making the first commit, follow these additional steps to set up the project structure:
- Create an ASP.NET Core Web API Project:
- Inside the
srcfolder of your solution, create a new ASP.NET Core Web API project. - Name the project
BookShop.API. - In the Additional Information dialog:
- Authentication Type: Choose No Authentication.
- Enable Docker: Check the box to add a Dockerfile.
- Controller Options: Select Use Controllers.
- Click Create to generate the project.
- Create Class Libraries:
- Inside the
srcfolder, create two Class Library projects:BookShop.BLLfor business logic.BookShop.DLLfor data access logic.
- Ensure both projects are added to the solution and referenced appropriately where needed.
- Folder Structure:
- Ensure the
srcfolder contains theBookShop.API,BookShop.BLL, andBookShop.DLLprojects.
Step 4: Link to GitHub Repository
After setting up the local structure, we will connect the project to a GitHub repository:
- Log in to GitHub.
- Create a new repository and name it
BookShop. - Link your local project to the GitHub repository by following these steps:
- Open a terminal or command prompt in your project directory.
- Run the following commands:
git init
git add .
git commit -m "Initial commit"
git branch -M main
git remote add origin <your-github-repo-url>
git push -u origin main
This will upload your project to GitHub and complete your initial setup.
Note:
Using the Toptal Gitignore Generator ensures that unnecessary files like build artifacts and IDE-specific configurations are excluded from your repository. By including filters for ASP.NET Core, Visual Studio, Visual Studio Code, and Rider, you are optimizing your project for modern application development tools.
Some External Links
- Microsoft Documentation: Introduction to ASP.NET Core Authentication
- Microsoft Documentation: ASP.NET Core Authorization
- GitHub: Best Practices for ASP.NET Core Projects
- Toptal Gitignore Generator
- Official Git Documentation: Setting Up a Repository
- Entity Framework Core Documentation
- Docker Documentation: Getting Started
- Stack Overflow: Common Issues with ASP.NET Core Authorization
- Pluralsight: ASP.NET Core Security Tutorials
- YouTube: Setting Up ASP.NET Core Authentication and Authorization
My Others Tutorial Links:
- Transforming Legacy Systems: Unlock Seamless Migration with the Strangler Fig Pattern (Part 1)
- Unlock the Secrets of ASP.NET Core 9 Authentication and Authorization: A Powerful Step-by-Step Guide (Part 1)
- Simplifying Microservices Communication with Ocelot in ASP.NET Core 9.0
- Master Simplified Microservices Communication with YARP API Gateway in ASP.NET Core 9.0
- Why You Should Migrate to ASP.NET Core 9: Exploring the New Features
Next Steps
With the initial setup complete, we are ready to move on to the next phase: implementing the Identity Server database and basic project structure. Stay tuned for Part 3, where we will begin writing code to bring our user story to life!